Showing posts with label Sewing. Show all posts

Tuesday, 12 December 2017

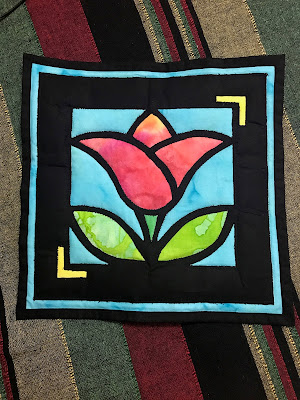
Stained glass quilt - my first attempt

Thank you for your thoughts on my last post , everything is under control now .

I have been away from the blogland due to my health reasons again and was advised bedrest :( I was mostly surfing pinterest and reading . I did complete my Goodreads reading challenge of 24 books this year so that's a consolation.

I had attended a stained glass quilt workshop organised at a fellow quilter's home . I am not into quilting but wanted to try patchwork . I chose the easiest pattern and also generated lot of learn-by-mistakes events for everyone in the workshop ...lol . But I braved the entire patchwork with sewing machine because I am not good at working with machine .


I made it in Dec, 2016 but completed the border just two months back . It took me almost one year to get it here. It measures approximately 16"x16" . I also tried the mitered corner while making the border and it wasn't that intimidating .

And yes, please don't comment with a get-well message as I don't want to make it a norm for me . I should better get used to these new-to-me health issues but it is slowing down my life often when I am about to or in a mode to speed up . I would rather appreciate if you share a link of your choice to a free pattern or tutorial to just feel happy :)

Can't wait to see what you all have been upto , I hope all is well and you are preparing for Christmas :)

Happy crafting!
Preeti


Tuesday, 7 November 2017

Thread Catcher

Thanks for your comments on my last post . Finally , I have a sewing finish to show .


After seeing thread catcher on various blogs , I decided to make one . It is a one day finish item and I  did both hand and machine sewing . It was good to use sewing accessories - mat, rotary cutter , quilt ruler , marking pen which usually are rarely used . The free tutorial can be found here  .

I have run out of some threads for my cross stitch WIPs and will hopefully receive in few days .

Here are some great pictures of the skyline as viewed from our seventh floor apartment and taken by Anshita in last two months .

views from bedroom balcony during monsoon rains


Rain arriving from a distance


Below are the views from the front main balcony

dark clouds just after sunset

October skyline


Hope you enjoyed seeing the pics . Our front balcony is west facing so we get to see sunset everyday :) Some of these are very beautiful compared to the sunsets we have seen at various tourists places .

Have a crafty week ahead
Preeti

Tuesday, 13 December 2016

Crafting new things :)

Hello , hope you are having a busy creative time . Two weeks back , Raj and Anshita had their Birthdays and apart from store bought gifts and cooking their favorite food ,  I also made something handmade for them .

Crochet Scarf for Anshita :)

Crochet red heart ribbon yarn scarf


I had this Red Heart boutique ribbons yarn in my stash for a long time and I used this free scarf pattern . There is a video on the same link which is more helpful than the written pattern and one has to wind the yarn in a specific way which is also shown in the video . The scarf turned out a bit long as I just wanted to finish that one ball :)

We went out with few of Anshita's friends to play laser tag . They aren't yet ready to grow up :)

For Raj , I made a zippered passport bag :)

zippered passport bag
Not sure if he will use it but he was happy to get one . I used chain stitch to embroider 'Bon voyage' on a patch of felt fabric .


I made an eggless vanilla sponge cake which turned out very well and spongy . Recipe here .

I have completed cross stitch ladybird fairy but I don't have time to take nice pictures . Hopefully, I will share before the year end .

Happy crafting! :)
Preeti


Monday, 14 March 2016

Aren't we cute ? :)

I am sure this mom & baby image of cute owls will bring a smile on your face :) 


This is made with craft felt which I have been stashing for a long time . I saw it on pinterest and made a free hand drawing on paper . Lesson learnt for next time -  make a proper template for each part . Anyways , with trial and error , I successfully completed on weekend .


I started working on Julia blackwork . I wanted to make it larger size and also since I was new to blackwork I decided it will be easier to work on bigger count and I was already done with failed attempts on 18, 16 and 14 counts :(


This is what it will look when completed .

Blackwork can be done with both backstitching and Holbein stitch . Ideally it is done with Holbein stitch when the pattern is reversible . The chart mentioned the use of Holbein stitch but I could not track the stitching back at many points, I think partially because the design is not an easy fill . So rather than getting frustrated, I am stitching with a combination of both stitches because I don't need it to be reversible . The only thing I need to take care is not to jump long stitches from the back side . So far it is looking fine , not great . Have you done blackwork before and are you good at Holbein stitch?

Yesterday , I wore my fitbit for the first time and I completed 10,104 steps but the major chunk came from my morning walk . So the days I am going on walk, it is not difficult to hit the minimum count. Other days, I try to burn the equivalent amount of calories even if the steps are less . To reduce weight , I think I need 30k-40k steps everyday :) But I have learned a hard lesson from my previous ways of reducing weight that slow and steady lasts longer, and I am making a reasonable progress there :)

Have a crafty week ahead!
Preeti :)


Monday, 4 January 2016

Ravelry Crochet Exchange !! :)

Happy new year !! :)

No, this is not my first finish of 2016. We had a Secret Santa exchange on the Ravelry group 'Crafty Dozen' from India . I am not so active on Ravelry and all the more scared when it comes to exchange deadlines but I wanted to participate in a crochet exchange so I decided to dive in .

The moderators defined the rules including the approx cost of gifts (excluding handmade and postal charges). It is good to have that way so that there are no worries that we have fallen short of satisfying partners . But if exchanges are across the countries then it is difficult to do so . There were total 26 participants .

This is what I sent to Bhavani, she used to blog earlier but is not active now.

Crochet sling bag

This is the back side. I used Laura knitting cotton and 4 mm hook. 


fabric pincushion

 I also made this fabric pincushion, my very first, as another handmade. I made my first needle book and gave it in cross stitch exchange and now my first pincushion too. Both the times, I was tempted to keep those for myself but I was equally glad to give to a fellow crafter:) I don't have a needlebook or pincushion. This also reminds me that I mentioned about showing how-to steps for my needlebook.  Below are the goodies I sent to her .

1.paper yarn, A4 card sheets with jumbo prints, bling sticker, handmade diary
2. Assorted buttons, pegs, cute jumbo printed buttons and rose shaped beads.

Anchor knitting cotton balls and Turkish Nako Saten yarn. 

I tried to cover all she liked and the colors she loved . I was glad she liked everything very much :)


And this is what I got from Shruti . She is active on Ravelry . I was so elated to receive the mega package and especially the handmade:)

Zipper pouch for Anshita

1. Pony crochet hooks set, individual hooks, Circular needles, T-pins and ladybug buttons
2. Quilling strips, floral printed binder clips, sticker lace- for me and Anshita both

1. A long heart printed fabric table runner.
2. Pure wool, Pure silk thread (dark blue), Rayon and cotton thread for crochet.

And.....This is the huge handmade gift that I got....Mini rings of change :))


Love the color spread at the center, stunning!!!:))

I have picked one of my cross stitch projects after many days . I hope to show some progress in few days/weeks time :)

Have a crafty week and year ahead!!
Preeti


Monday, 5 January 2015

Messy to Classy link party !!!!!

Thank you, my dear friends, for your wishes on my last post about my published piece in the magazine :)

Few days back, I mentioned here about my plans to start a link party on reorganizing/arranging your craft spaces. After getting your feedback and great tips from my blogger friends about link parties, here I am ready with my introductory post.

Messy-to-Classy link party for craft spaces

It took me some time to learn about linky widget and creating grab button etc. I have added a tab on the menu bar, extreme right, where I have given information and signing up details. 

Please click on the tab or click here to sign up for the party. If you want me to add any more details, please let me know.

Let the ideas pour in :)
Thank you for visiting !!
Preeti 


Tuesday, 7 October 2014

But I can sew .........

What if my finger doesn't allow me to stitch and crochet, I can sew . At the first place, I got hurt with sewing machine and the irony is that I can, in this situation, work with sewing machine only . The hurt is not that bad but at the wrong place ----tip of index finger of my right hand . While sewing, I heard a sound and thought that the needle has broken. To check that, I touched the needle tip carefully with my finger but accidently pressed the foot pedal and the needle poked my finger. It pains when I hold a pen or any needle . So I am sewing these days.


I made this printer cover . A long pending task which I avoided because the box type cover was a bit intimidating for me .

printer cover

This medium weight fabric was in my stash for the past 8 years with which I had planned to make a skirt for Anshita.

What else, I was able to put floss on more bobbins and I filled both the boxes.


Then, I completed sewing the cushion covers on which I am going to attach (hand sew) the crocheted pieces. I made 5 covers sized 16"x 16" and 2 covers measuring 24"x24"


The left ones are the smaller ones. The printed side will be on the back and the crochet piece will be attached on the white front.

I am in the process of arranging my craft room, will share the pics. Right now, the soft boards are being used for miscellaneous household bills. Above few pics are from my craft room.
 
Have a crafty week ahead!
Preeti :)


Tuesday, 17 September 2013

A Lining Stunt !!!!! ;))

I call it a stunt because I did it on my sewing machine ;) I am still a beginner as far as sewing on a machine is concerned.
I made a purse/bag for Anshita which was pending for lining for around 5 months. She raised an alarm last month to complete it because she wanted it for her school field trip to a museum.
Two weeks back, in a hurry, I had spent full day to put the pieces of purse together and adding a lining to it. I tried taking pictures to form a tutorial. This is my first tutorial on sewing. After initial ramblings, most of them are simple step-by-step images. Hope I make some sense.

Few assumptions to keep your expectations low:))
1. Tutorial by a beginner who doesn’t get her stitches straight on a sewing machine
2. The tutor is scared of pins so runs through the edges roughly
3. The tutor is a bad photographer
4. She is at times wrong in assessing measurements and does end up with few adjustments.

To begin with, let me state that the purse is closed on sides and open from top to bottom. I have used the waterproof lining material which I had won on Rajeswari’s giveaway. I liked working with it :)

Take a rectangular lining piece that would cover the entire inside of the purse lengthwise. I have joined two pieces. Take another small rectangular piece for bottle cozy enough to cover the circumference of a bottle at the bulkier part. Take an inch extra on both sides for the seam and to attach it to the main lining piece. Here, I ended up with slightly bigger bottle cozy and did an adjustment while sewing.

Createwittyunleashed.blogspot.com:lining tutorial


Createwittyunleashed.blogspot.com:lining tutorial
Attach the cozy in the center of main lining piece facing right side.
Click on image to read instructions
 
Createwittyunleashed.blogspot.com:lining tutorial
I didn't have a plain elastic, so I used the one with a frill and hand sewed it on the front by stretching the elastic to cozy's length. If you are using a plain elastic then hand sew it from inside. Add on both top and bottom.

Createwittyunleashed.blogspot.com:lining tutorial
Create a pocket
 
Createwittyunleashed.blogspot.com:lining tutorial
Attach it from the front next to lining (either left or right )


Createwittyunleashed.blogspot.com:lining tutorial
Looks fine, right?

 
Createwittyunleashed.blogspot.com:lining tutorial
Fold the main lining piece from the center.  

Createwittyunleashed.blogspot.com:lining tutorial
and sew the other end

Createwittyunleashed.blogspot.com:lining tutorial
turn inside out, this is how it will look with bottle cozy in the corner of purse to hold the bottle firmly

Createwittyunleashed.blogspot.com:lining tutorial
put it inside the purse.

I will show the purse in next post in couple of days. This tutorial has made me realize that writing tutorials is not an intimidating task . Just that while writing tutorial, you must not look before or after into the kitchen ;)

Have a nice day!
Preeti :)


Related Posts Plugin for WordPress, Blogger...